
Final Fantasy III - Guide


The story unfolds with a young woman and two Imperial soldiers on their way to the city of Narshe looking for a lost Esper. As you make your way north through the town, the guards will try to stop you but they are no match for Imperial Magitek armor. If any party member has low health, use the Magitek Heal Force ability to recover. When you reach the mines, a gate inside will bar your path. One of the defenders will unleash a powerful monster, Whelk.

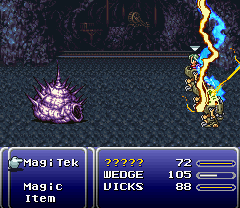

Whelk has a special counter attack that goes off whenever his shell is attacked. During the fight, he will retreat into his shell where he can't be targeted but he can't attack either. Be careful not to attack him when he is in his shell or you will be on the receiving end of his powerful counter attack, Mega Volt. Simply wait him out until he pops out again. Use the weapons on the Magitek Armor when Whelk is outside his shell.


When you get near the frozen Esper, it will react to the young woman and she blacks out. She wakes up in an old man's house and it is revealed a slave crown was used to control her. Her name is Terra and she has the rare gift of magic, making her very valuable to the Empire. The Narshe guards show up looking for her so you must escape through the back door into the mines. The enemies are a bit tougher without the Magitek armor but Terra has powerful magic to heal and attack with if needed. Eventually, you will be confronted by the guards and fall down in a cave in.


The treasure hunter Locke shows up at the old man's house and is sent out to help Terra. As he reaches the cave in, a small army of city guards arrives to capture her. Some Moogles who live nearby in the mines show up and offer to help Locke defend Terra. You have 3 teams to work with and can switch between them with the Y button. The commander can be a tough nut to crack so you may want to keep one team out of the fighting so they are better prepared to take him on. The Vomammoth's are the biggest threat here with their blizzard attacks so target them first if you see them.
After the battle, Locke will escape the mines with Terra. You need to make your way from Narshe down to Figaro Castle in the south, located in the middle of a large desert. You can learn about battles and find some items at the scholar house in Narshe before you depart.


When you arrive at Figaro Castle, head up into the throne room to meet Edgar, the King of Figaro. It seems he and Locke are old friends and is willing to help Terra. You can look around the castle and pick up a few items. Talk to the matron mother in the west tower to learn about Edgar's brother, Sabin.


Find Edgar again in the throne room and you will be interrupted by an eccentric officer of the Empire. Edgar confronts Kefka, who is looking for Terra. Kefka will leave without much trouble and Locke will show you to Terra's room in the east tower. Locke explains their involvement with a group called the Returners, an organization working against the Empire.


During the night, Edgar will wake up sensing something is wrong. Kefka has engulfed the castle in flames and demands Edgar give Terra up. Talk to the soldier above to ready Edgar's plan. As your trio makes a dramatic escape on Chocobos, Figaro Castle's special defense mechanism engages and it descends below the sand. Kefka's soldiers catch up to your party using Magitek armor. Edgar's autocrossbow is a very powerful weapon and should make quick work of the 2 imperial soldiers. Terra can use her magic, much to the surprise of Locke and Edgar!


After the battle, ride the Chocobo to the cave to the east. Figaro Cave is a short passage through the mountains but there are some easy treasures to grab on your way. If you are in need of healing, drink from the spring near the entrance to regain your health. Exiting on the other side, you can travel a short distance to the east to find the town of South Figaro.
In South Figaro, you can visit the shops to buy new weapons and armor. You can also buy Relics which will make your party members stronger. The Sprint Shoes are especially helpful for getting around faster but they have to be equipped on the lead member of the party. You can find a mysterious character named Shadow at the cafe.


North of South Figaro, there is a small house you can visit. Edgar will comment on familiar things in there that reminds him of someone. You may want to spend some time leveling up and when you are ready, head to the path to the east to enter Mt. Kolts. As you climb the mountain, you will see a shadowed figure jumping around. Eventually, you will come to a man named Vargas, who is a powerful martial artist. Use Edgar's autocrossbow to help get rid of the 2 bears as soon as possible. With them out of the way you can concentrate on Vargas himself. This is a tough fight so don't let anyone's HP drop too low since each enemy packs quite a punch! Eventually, another martial artist, Sabin, drops in on the battle and confronts Vargas. Your entire party is blown away with a special attack leaving only Sabin. Sabin has his own unique special attack that will end this fight in a single move: use the blitz command and then enter the button combination "left, right, left" and press A to confirm to perform the Pummel. With Edgar and Sabin reunited, continue on through Mt. Kolts to the Returner base on the other side.


Talk to the Returner inside and he will lead you to their leader, Banon. He will explain how Terra's abilities are crucial for the Returners and asks her to join. You can look around the base for an assortment of items and when you are ready, talk to the Returner at the entrance and he will tell you Banon is waiting outside. Your answer to whether you will join the Returners or not will result in him giving you a different item. If you keep refusing to join, you will get a Genji Glove instead of the Gauntlet. In the meeting, it's decided they need to go back to Narshe and the frozen Esper. A wounded Returner enters the hideout and brings the grave news that the Empire has invaded South Figaro and are on their way.


Locke heads to South Figaro to infiltrate and slow them down while everyone else will travel north to Narshe on the rapids of Lete River. It's essential to keep Banon alive; if his HP reaches zero it's game over. Banon has a special Health command that lets him heal the entire party. You may want to put him in the back row before you get on the raft. Special strategy: Lete river is home to strong enemies that give out a lot of exp. After the first save point, keep choosing to take the "up" path to keep looping around to get stronger. At the second intersection, go left to continue on. After the second save point, a powerful purple octopus will approach your raft. Ultros can deal out a lot of damage so have Banon use Health every time and don't be afraid to use healing items or Terra's Cure magic if someone is too low. Ultros really hates heat so Terra's Fire magic is especially effective. Sabin's Blitz and Edgar's Auto Crossbow will make short work of Ultros. Sabin decides to show off a bit and uses a special move to finish Ultros off. Unfortunately for him, he falls off the raft and drifts away!
You now have your choice of 3 different scenarios between your split up party. These scenarios can be done in any order you choose so don't worry about missing anything!
Locke's Scenario


Locke starts without any equipment on so be sure to equip everything in case you run into trouble. South Figaro is under heavy guard so Locke will need a disguise to get around. Be careful of the Magitek riders, they are looking for a fight. Talk to the merchant in the item shop and he will goad Locke into a fight. Keep using the Steal command on him until it is successful and you will be able to steal his clothes to use as a disguise!


The merchant clothes will get you past the kid guarding the stairs in the large house. You can steal the clothes of the green soldier in the north part of town and use the disguise to get through the guard leading south. In the cafe, you can find another merchant downstairs. Fight him to steal his clothes and pick up the cider delivery for the old man.


Deliver the cider and the old man will tall you of a secret passage downstairs. Tell his grandson the password is "Courage" and he will open a passage that leads to the mansion on the west side of town. On the second floor of the mansion, go into the secret passage behind the bookshelf. In one of the rooms downstairs, you come across an imprisoned woman. As it turns out, she is Celes, a famous general of the Empire. Enter the room to release her and she will join you in your escape from South Figaro. Check out the clock in the room outside for a secret passage leading outside the town. To get back to Narshe, go through the cave you used to get from Figaro Castle to South Figaro. You may want to spend some time leveling up before you go and you can rest at the house north of South Figaro if you need. As you are going through the cave, you will hear an ominous rumbling so heal up when you get near the other side. At the exit, a contraption called TunnelArmr will burst from the wall and confront the party. Celes can use her Runic ability to absorb any magic cast after she activates it. Have Locke attack or heal with items and have Celes use Runic or cast Ice magic.
Terra, Edgar & Bannon's Scenario


Back on the raft, Terra and the others continue riding it down stream until it drops them off near Narshe. In Narshe, the guards recognize Terra and not even Banon is able to convince them to let you pass. Find the secret entrance to the left of the school you used earlier to get into Narshe's caves. When you enter a room with a glowing light, watch its path closely then follow the same path to reach the other side. Through the caves, make your way back to Arvis's house, where Banon explains the situation.
Sabin's Scenario


Sabin finds himself washed ashore near a house. Outside the house, you can find Shadow, who will join you but warns he will leave whenever he feels like it. The Chocobo merchant has a few items for sale and you may want to pick up some throwing weapons that only Shadow can use in battle. From the house, travel east then south and you will find an Imperial base near a bridge. Inside the Imperial base, you can find some items in the tents but you will also spot Kefka and other Imperials preparing an attack on Doma Castle. In Doma, a knight named Cyan leads a counter attack against the Imperial forces. Use Cyan's Sword Tech ability to charge your attacks and send their commander packing.


Back in the Imperial camp, Sabin and Shadow discover Kefka's new plan to capture Doma. After confronting him, he runs off after being hit a few times. Keep chasing him through the camp and eventually he manages to sneak away. With his plan to poison the water supply put into action, the people of Doma soon feel its consequences. Cyan is the only survivor and in a rage, he single handedly attacks the Imperial Camp. Speak to him and give him a hand as he goes around dispatching Imperial soldiers. After you fight your way back to the entrance of the base, he will join your party.
Traveling south, you will find yourself in the Phantom Forest. Inside the forest, you will find a spooky run down train station. Go inside the Phantom Train to look around and you will be in for a nasty surprise: the train doesn't want you to leave! The party decides to get to the engine to try and stop the train before it reaches its destination but first head back to the caboose and you can find a helpful ghost that will temporarily join your party. Not all of the ghosts in the train cars are hostile; there is a merchant among them you can buy items from.
Moving toward the engine, the party will be swarmed by ghosts. After climbing on the roof to jump to the next car, go inside to flip the switch to detach the rear of the train. Hit the switch again to open the way forward. Have a seat in the dining car to receive a meal that will restore the party's HP and MP. Inside a private room you will find a treasure chest but a mysterious man named Siegfried will show up laying claim to it and challenges the party to a fight. Don't let the boss music fool you, this guy is all talk. After being easily defeated, Siegfried takes the treasure and makes his escape. As you get close to the engine, your ghost friend will take his leave. To stop the train, you need to press the first and third switches in the engine then push the switch outside on the smoke stack.
The Phantom Train chases you along down the track using its wheel attacks and occasionally an acid rain attack that hits all party members at once. Between Sabin's blitzes, Cyan's sword tech and Shadow's throw ability you can deal out a lot of damage very quickly. Just make sure you keep an eye on everyone's HP as the acid rain can change the tide of battle very quickly. However, there is another way to end the battle very easily: the Phantom Train is undead and a Phoenix Down will have an interesting effect on it.
At the platform where the Phantom Train lets you off, you see people boarding to be taken to the other side. Cyan sees his wife and son among them and after a teary farewell the party continues on. At the Baren Falls, Shadow will leave if he hasn't already. On the way down, the party will be attacked by waves of enemies ending with the powerful Rizopas. Keep your HP up and beware his El Nino attack.
Sabin and Cyan will wash ashore in a region called the Veldt. A strange boy named Gau will find them but will run away. Your first stop in the Veldt is the village of Mobliz in the east. As you travel across the Veldt, you may encounter Gau again after all of the enemies are defeated. He doesn't attack and mentions he is very hungry. When you arrive at Mobliz, you can pick up the Dried Meat at the item shop and use it on Gau to gain his trust. Gau will tell you about his shiny treasure in the cave in the southern area of the Veldt. Before you go there, you may want to have Gau fight around the Veldt a bit first and use is Leap command to learn the attacks of enemies in the area. When you are ready, go to the cave and have a look around. It turns out the shiny treasure was actually a diving helmet that can be used to travel through Serpent's Trench.
Jump in the river from Gau's cave and you will find yourself being swept away in Serpent's Trench. As you come up to certain parts, you can decide which direction you want to go. If you go left twice, you will go straight to the end. Alternatively, you can go right twice which will take you through item filled caves before being dropped off at Nikeah. In Nikeah, do some last minute shopping and buy better equipment for everyone in your party, even the ones not with you. Make sure you have a good supply of healing items too. When you are ready, take the ferry at Nikeah's docks to South Figaro.


